Slow Sunday Cast Iron Skillet Pizza
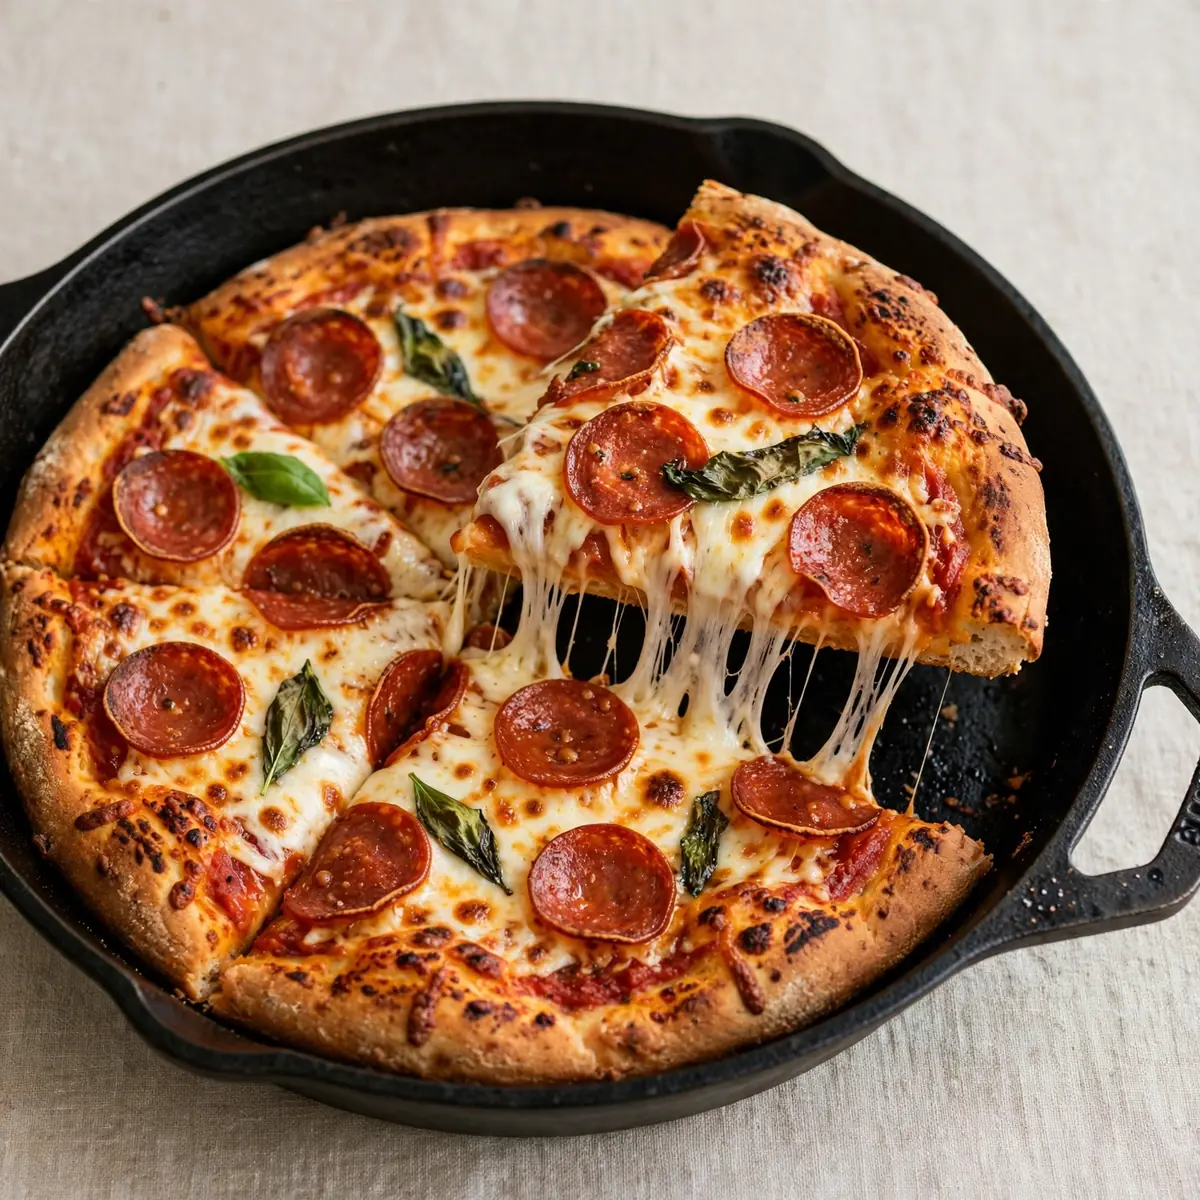
Some weekends call for a slow, deliberate kind of cooking, the sort where the kitchen fills with warmth and the promise of something wonderful. For me, that ritual is a cast iron skillet pizza, a project that rewards patience with a crust so perfectly crisp and chewy it feels like a secret worth sharing. Let’s get our hands a little floury and make a pizza that turns a quiet Saturday into a proper occasion.
Recipe Overview
- Prep Time: 2 hours (includes 1 hour 30 minutes resting time)
- Cook Time: 25 minutes
- Total Time: 2 hours 25 minutes
- Servings: 4
- Difficulty: Medium
Why You’ll Love This Cast Iron Skillet Pizza
- That golden, shatteringly crisp base: The cast iron skillet holds heat like a champion, giving the underside of the dough a deep, nutty crust that a baking sheet simply cannot replicate.
- A satisfying, hands-on process: Kneading the dough and watching it rise offers a quiet, meditative break from a busy week.
- Endlessly adaptable: This dough is a blank canvas, happy to carry whatever toppings your pantry and imagination suggest.
- Cosy weekend vibes: The aroma of baking dough and melting cheese slowly filling the house is the very definition of a comforting, slow-paced afternoon.
- My kids absolutely devour this every time I make it. There’s rarely a crumb left on the board, which is the highest compliment I can give.

Ingredients You’ll Need
- 500g strong bread flour, plus extra for dusting
- 7g sachet fast-action dried yeast
- 1 ½ teaspoons fine sea salt
- 1 teaspoon caster sugar
- 325ml lukewarm water
- 3 tablespoons extra virgin olive oil, plus extra for the bowl and skillet
- 400g tin of chopped tomatoes
- 2 cloves of garlic, finely grated
- 1 teaspoon dried oregano
- 200g mozzarella, torn into small pieces
- 60g grated Parmesan or vegetarian hard cheese
- A handful of fresh basil leaves
Tip: Using strong bread flour rather than plain flour gives your dough the necessary gluten structure for that coveted chewy bite. It makes all the difference to the final texture.
How to Make Cast Iron Skillet Pizza
- Make the dough: In a large bowl, whisk together the flour, yeast, salt, and sugar. Make a well in the centre and pour in the lukewarm water and 2 tablespoons of the olive oil. Using a fork, bring the mixture together until it forms a shaggy, slightly sticky dough. The flour will smell earthy and the yeast will begin to activate as you stir.
- Knead to smoothness: Turn the dough out onto a lightly floured surface. Knead for 8 to 10 minutes, pushing the dough away from you with the heel of your hand and folding it back. You’ll feel it transform from a rough, tacky mass into a smooth, elastic ball that springs back when you poke it. The surface should feel silky, not sticky. I’ve been making this for over 5 years, and it never disappoints when you take this time.
- First rise: Place the dough in a clean bowl lightly greased with olive oil. Cover with a damp tea towel or cling film and leave it in a warm, draught-free spot for 1 hour, or until it has doubled in size. You’ll know it’s ready when you press a finger into it and the indentation stays.
- Prepare the sauce: While the dough rises, make the sauce. In a small bowl, mix the chopped tomatoes with the grated garlic, dried oregano, and a pinch of salt. The sauce should smell sharp and aromatic. Set aside to let the flavours meld.
- Shape the pizza: Once the dough has risen, tip it onto a lightly floured surface. Press it gently to knock out the air, then stretch it into a round about 25cm in diameter. Don’t worry about a perfect circle—an organic shape feels more rustic. The dough will feel soft and pillowy beneath your hands.
- Preheat the skillet: Place your 25cm cast iron skillet on the hob over a medium-high heat. Add the remaining tablespoon of olive oil and swirl to coat the base. When the oil shimmers and you can feel the heat rising from the pan, carefully lay the dough into the skillet. It will sizzle immediately against the hot metal, a sound that signals the start of something good.
- Assemble and bake: Spread the tomato sauce evenly over the dough, leaving a small border for the crust. Scatter the torn mozzarella and grated Parmesan over the top. Transfer the skillet to an oven preheated to 240°C (220°C fan). Bake for 18 to 22 minutes, until the cheese is bubbling and golden in spots and the crust is a deep, burnished brown. The kitchen will smell of toasted bread and melted cheese. Let it rest in the pan for 5 minutes before sliding it out and scattering fresh basil over the top.
Tips From My Kitchen
- Get your skillet screaming hot before adding the dough: This initial blast of heat on the hob is what creates that shatteringly crisp base. If the pan isn’t hot enough, the dough will absorb the oil and turn greasy rather than forming a golden crust. You want to hear a confident sizzle the moment it hits the metal.
- Don’t skimp on the dough resting time: The long, slow rise is what develops the flavour and structure of the crust. A rushed dough will be dense and tough, lacking the airy, open crumb that makes skillet pizza so special. Patience here is your greatest tool.
- Use good quality tinned tomatoes: Since the sauce is so simple, the tomatoes need to shine. Choose whole peeled plum tomatoes and crush them by hand for a chunkier texture, or use a passata for a smoother finish. Avoid cheap, watery varieties that will make the base soggy.
- Don’t overload with toppings: It’s tempting to pile everything on, but a heavy load will steam the dough rather than bake it, leading to a floppy, sad centre. Stick to a moderate layer of sauce, a generous but not excessive amount of cheese, and a few carefully chosen toppings.
- Let the pizza rest in the pan after baking: That five-minute rest is crucial. It allows the cheese to set slightly and the crust to finish crisping up from the residual heat of the cast iron. If you try to slice it immediately, you’ll end up with a messy, molten slide of cheese and sauce.
Common Mistakes to Avoid
- Overcrowding the pan: Adding too many wet toppings like raw vegetables or extra sauce creates steam that prevents the crust from browning. The base will turn out pale and doughy rather than crisp and golden. Stick to a moderate layer and pre-cook any particularly wet ingredients like mushrooms or peppers.
- Wrong temperature: Baking at too low a temperature will dry out the dough before it has a chance to brown, leaving you with a hard, pale crust. The oven needs to be fiercely hot—240°C is ideal—to mimic the intense heat of a pizza oven. A preheated baking sheet on the shelf below can also help radiate heat upwards.
- Skipping the rest time: Cutting into the pizza straight from the oven is a common urge, but it ruins the texture. The molten cheese will slide off and the crust will steam itself soft. Letting it rest for a few minutes allows the structure to set, giving you clean slices and a satisfying crunch.
Delicious Variations to Try
- Spicy Version: Add a finely chopped red chilli to the tomato sauce, or scatter some dried chilli flakes over the cheese before baking. For extra heat, top with slices of spicy chicken sausage or beef meatballs after the pizza comes out of the oven.
- Vegetarian/Vegan Option: Load the pizza with roasted vegetables like courgette, aubergine, and red pepper, or use a dairy-free mozzarella alternative. A drizzle of pesto after baking adds a lovely herby richness without any cheese at all.
- Different Protein: Swap the mozzarella for a layer of shredded cooked chicken or thinly sliced beef steak. Leftover roast chicken works beautifully, or try strips of grilled halloumi for a salty, satisfying twist. For another comforting meal, consider pairing this with a bowl of Ground Turkey Chili for a hearty weekend spread.
What to Serve With Cast Iron Skillet Pizza
- A crisp green salad dressed with lemon and olive oil to cut through the richness of the cheese.
- A bowl of marinated olives or roasted peppers for a tangy, briny contrast.
- A side of Crispy Chicken Tenders With Honey Mustard if you’re feeding a hungry crowd who want more than just pizza.
- For a light start, a platter of Appetizers like bruschetta or garlic bread with fresh tomatoes.
- A simple dessert like Homemade Lemon Bars to finish the meal on a bright, sweet note.
Still hungry for ideas? You might also love Tender Country Fried Steak Cast Iron from our sister kitchens.
Frequently Asked Questions
Cast Iron Skillet Pizza
Ingredients
Method
-
Make the dough: In a large bowl, whisk together the flour, yeast, salt, and sugar. Make a well in the centre and pour in the lukewarm water and 2 tablespoons of the olive oil. Using a fork, bring the mixture together until it forms a shaggy, slightly sticky dough. The flour will smell earthy and the yeast will begin to activate as you stir.
-
Knead to smoothness: Turn the dough out onto a lightly floured surface. Knead for 8 to 10 minutes, pushing the dough away from you with the heel of your hand and folding it back. You’ll feel it transform from a rough, tacky mass into a smooth, elastic ball that springs back when you poke it. The surface should feel silky, not sticky. I’ve been making this for over 5 years, and it never disappoints when you take this time.
-
First rise: Place the dough in a clean bowl lightly greased with olive oil. Cover with a damp tea towel or cling film and leave it in a warm, draught-free spot for 1 hour, or until it has doubled in size. You’ll know it’s ready when you press a finger into it and the indentation stays.
-
Prepare the sauce: While the dough rises, make the sauce. In a small bowl, mix the chopped tomatoes with the grated garlic, dried oregano, and a pinch of salt. The sauce should smell sharp and aromatic. Set aside to let the flavours meld.
-
Shape the pizza: Once the dough has risen, tip it onto a lightly floured surface. Press it gently to knock out the air, then stretch it into a round about 25cm in diameter. Don’t worry about a perfect circle—an organic shape feels more rustic. The dough will feel soft and pillowy beneath your hands.
-
Preheat the skillet: Place your 25cm cast iron skillet on the hob over a medium-high heat. Add the remaining tablespoon of olive oil and swirl to coat the base. When the oil shimmers and you can feel the heat rising from the pan, carefully lay the dough into the skillet. It will sizzle immediately against the hot metal, a sound that signals the start of something good.
-
Assemble and bake: Spread the tomato sauce evenly over the dough, leaving a small border for the crust. Scatter the torn mozzarella and grated Parmesan over the top. Transfer the skillet to an oven preheated to 240°C (220°C fan). Bake for 18 to 22 minutes, until the cheese is bubbling and golden in spots and the crust is a deep, burnished brown. The kitchen will smell of toasted bread and melted cheese. Let it rest in the pan for 5 minutes before sliding it out and scattering fresh basil over the top.
Notes
I hope this recipe becomes part of your own weekend rhythm, a small, joyful project that fills your kitchen with warmth and your table with smiles. I’d love to know how yours turns out—drop a comment below and tell me about your favourite toppings, or any little twists you added to make it your own.